Doctor’s Notes From Seattle Plastic Surgeon Hakim Said, MD FACS

There are just certain facts about recovery that are consistent across any human who has just undergone surgery. Having studied the recovery process intensely for years, I have developed many solutions to streamline your experience. There is no reason to reinvent the wheel.
Regardless of the specifics of your procedure, I am certain many of my suggestions will be helpful, and I hope you will put these to use in your recovery, whether you had your surgery from me or someone else. If you are having issues with your recovery, please don’t be afraid to schedule a consultation so we can discuss ways to get you back on track.
- Hakim Said, MD FACS, Seattle Plastic Surgeon
New ERAS of Pain Recovery
The conventional wisdom on recovery from surgery has been relatively intuitive. “Manage pain with pills. Stay immobile. Let the body heal.” It’s also been relatively wrong… at least in terms of minimizing recovery times. There’s a new movement growing in the medical community called ERAS (Enhanced Recovery After Surgery). ERAS is a more active form of pain management that uses a multimodal approach to minimize pain while also minimizing the use of opioids. The results have been very impressive, which is why I have incorporated many of the touchstones of ERAS in my recovery plans. Compared to opioid-centric pain management for surgery patients, ERAS:
(Source: American Association of Nurse Anesthetists, 2018)
The overwhelming majority of the surgeries that I perform are outpatient surgeries that don’t require a hospital stay. Nevertheless, I believe shortening the most severe portion of the recovery time by 3-4 days and reducing the potential for opioid dependency is clearly worthwhile when it comes to positively impacting patient wellbeing. Nearly 50% of opioid overdose deaths involved a prescription opioid. As surgeons, we must do our part to reduce that number.
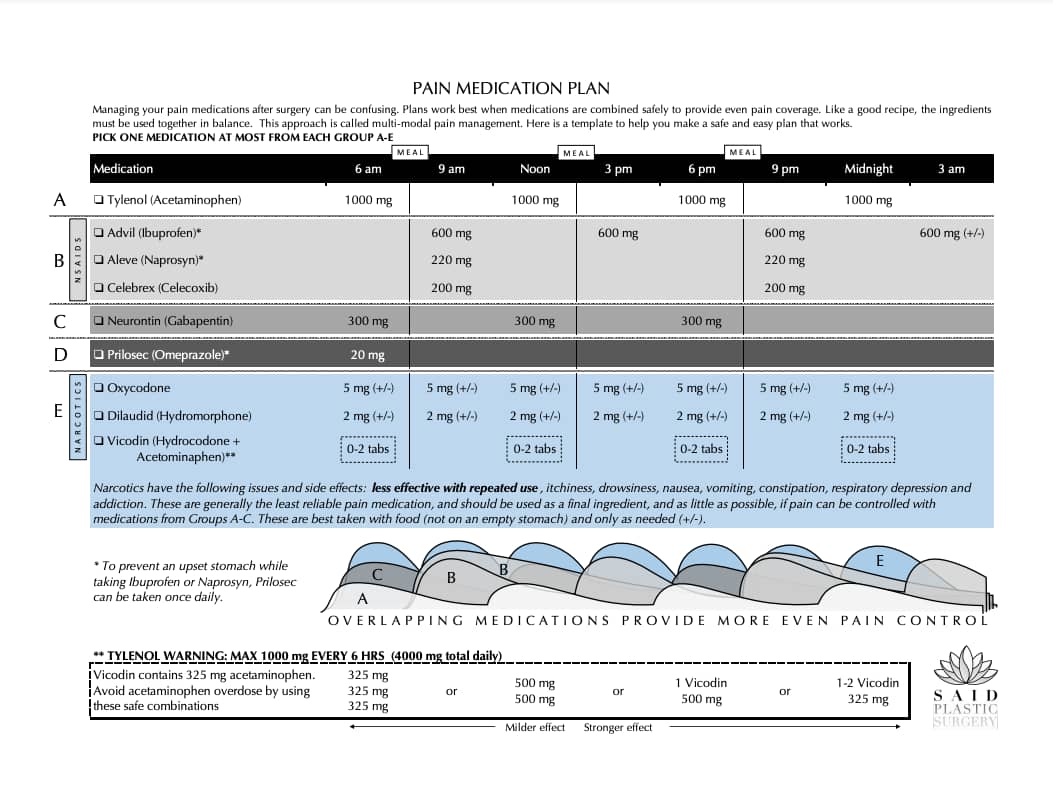

As you can see from the image above, the use of multiple staggered pain medications greatly reduces the need for narcotics while still capably managing pain. Narcotics are generally the least reliable pain medication and should be used as a final ingredient (and as little as possible) if pain can be controlled with more reliable medications. Narcotics are best taken with food (not on an empty stomach) and only as needed.
By following my multi-modal “recipe” for pain management, patients can manage their pain effectively without having to resort to a dependence on opioids. This chart is another great tool you can use to manage your pain meds effectively. In my experience, this system produces superior results in both pain relief and overall recovery times compared to the traditional narcotic-based treatment methods.
A Necessary Part of Healing
Many patients want to avoid drains and the reasons why are fairly obvious. Drains are a pain. They are unsightly. The idea of having a drain sticking out of your body oozing fluid is, quite frankly, kind of weird. Trust me, your surgeon understands. However, for many surgeries, the use of drains can dramatically reduce overall recovery time and decrease the chances of infection and complications.
Drains are especially useful at preventing fluid from collecting into pockets within the body called seromas. When seromas occur, they usually take longer to go away on their own, or you may require additional procedures to get rid of that unwanted fluid. Either way, seromas delay your body from healing together again. Drains keep that from happening.
By using drains in procedures where the chances of seromas are high, the fluid that forms in your body as a natural part of the healing process leaves the body through the drain as opposed to pooling up in these seromas. As the tissues begin to knit themselves together and the remaining fluid is reabsorbed into the body, the amount of fluid drainage starts to decrease. This is like an hourglass that lets us know when it is safe to remove the drain.
If you have a drain, this is one area where keeping things simple is better. There are lots of complicated drain management recommendations out there that just add more steps to your day, rather than improving your freedom. Here are some drain FAQs that might help you with drain management.
Before your drains are removed, we like to see the daily amount of fluid drainage remain at less than 30 ccs of fluid for at least two days in a row. At that point, call the office and we can schedule an appointment to have your drains removed. OR… you could do it yourself. Yes, really. Believe it or not, drain removal is a fairly simple process that you can do at home with a fairly low risk of injury. There’s even a YouTube tutorial on how to do it (I should know… I made it).
Once the fluid drainage has fallen below 30 ccs for 2 days in a row, you can snip the stitch on one side of your drain with a cuticle trimmer. This will allow you to remove the entire stitch without it getting stuck in your skin. After that, you should be able to gently yet firmly remove the drain from your body entirely, leaving a small hole that should heal in the next 2-3 days. To ensure the best possible chances for recovery, make sure the hole remains covered with a maxi pad to collect any remaining fluid and compress the area. If you don’t feel comfortable with this, you can schedule a consultation and we will remove the drain for you.
Here’s a great example of how simple is better. The simple answer is: try to avoid activities that disrupt your drain when possible, or you might end up delaying your recovery. Rather than coming up with a long list of what things you can and can’t do, just remember that you are healing from surgery and that the more stress you put on that area, the longer you will have to live with drains. Your drains are sutured to your skin. Tugging on those sutures causes pain. Disruption to those sutures causes more pain… and can disrupt the healing process, causing more drainage. More drainage = more time with drains.
If there’s an activity you really want to do, you need to make sure it doesn’t tug on that drain. You can use a thin film called Tegaderm on the area around the drain to keep it from tugging on the skin. However, before doing this, think about whether doing the activity is necessary, or if it’s something you can put off until after your drains are removed. If your ultimate goal is a faster recovery, then frame your decision with that goal in mind. I love skiing; I’m not doing it with a drain in my side.
Your drains should never be more than halfway full. If the bulb at the end of the drain has reached the halfway point, it is time to remove the bulb and measure how much liquid was in there. Even if the drain bulbs don’t fill halfway, it’s a good idea to empty them and measure the amount twice a day. This provides you with data so you can track your recovery and get those drains out faster.
I’ve seen all kinds of complicated instructions on how to cover your drains with clingy wraps and wild home protection ideas before showering. In general, this is another one of those areas where simple is better. You can shower with a drain… quickly. Just don’t soak or submerge yourself in water. A fast shower shouldn’t be enough of a problem to infect your drain, especially if you try to avoid soaking the area. Showers are fine. No baths or pools or hot tubs. Simple.
When Can I Resume My Normal Activities After Surgery?
I get a lot of questions about various activities from my patients. In general, I believe that simpler is better when giving advice about when to ease back into your normal routine following surgery. The simplest answer is right there in my description: ease back in. You are going through the healing process, and you’ll want to be fairly protective of your body as you resume moving, particularly the area around your surgery.
Here is my general timeline for activities following surgery: The first two weeks following surgery: Nothing strenuous; light walking or moving only. Two to four weeks: Listen to your body; avoid high-impact exercises. After six weeks: In most cases, you can resume high impact exercises (Crossfit and weights). Again, this is a general timeline.
For each activity you consider, think about that activity’s potential to impact your surgery site. A single rapid, high-impact maneuver (like a jumping jack, for example) can rip your healing tissues apart and set back your recovery. This is especially true if you have drains. Can you ride a bike? Sure, but if you fall, you might need revisional surgery. Is the bike ride worth that risk? Overall, my advice to my patients regarding post-surgery activities is three-fold: Be smart. Listen to your body. Give yourself time to heal.
Scars
I like to think of scars in terms of a timeline. The way that a scar is treated during that timeline will impact the timeline itself. This is why we call it the scar maturation process. There are certain moments along the scar maturation timeline where your intervention can do a great deal to shorten the process and improve the final result.
In general, scars that are fine, flat, pale, narrow, painless, and soft are considered “good” scars. They tend to fade faster and are less noticeable. When plastic surgeons talk about “invisible” scars, this is often what we mean.
A good scar is one that you have to really look for to know that it’s there. There are three main interventions that, when done at the right time, can help you create good scars during your recovery. The time to start is after the incision has sealed itself off, and before the scar has had a chance to develop scar problems — about 2-3 weeks after surgery. For an excellent start on getting a good scar, I recommend using as many of the following as possible for at least a month.
Far and away the best-proven treatment is applying silicone to the outer surface of the scar. There are several forms of it, including easy-to-apply silicone ointments and silicone sheets which come in many shapes, thicknesses, and sizes.
All seem to significantly speed optimal scar healing, so use the one that is easiest and works for you. Nothing else you can apply is even close in effect. Any commonly available product that contains silicone will work and can be easily ordered online. I recommend ScarFade and ScarAway. Several commonly used products are either ineffective (Mederma) or detrimental and can cause prolonged scar irritation (vitamin E, also listed as tocopherol in many ingredient lists).
Offloading the scar so it is not being pulled apart is the best way to avoid a stretched or widened scar. Tape is very effective at supporting a healing scar and preventing scar widening. Of course, the tape is irritating to many skin types, so find one that works for you. Leave the tape in place for several days until it begins to peel off, or is just too soiled, and then replace it over a fresh layer of silicone. I recommend one of these:
One of the worst things you can do to a scar is stretch it. That causes the scar to raise and widen, making the scar more visible and painful over time. The tape supports the scar, which means the body feels like it doesn’t have to work as hard to keep the wound closed.
Compression has been shown to prevent scars from expanding outward and serves to stop inflammation and scar growth in burn scars. We know it works, but we don't know how much pressure or how long to apply pressure. In severe cases, we use a compression dressing to hold pressure 24/7.
The philosophy behind compression seems to work even with massaging scars several times a day. I recommend forming a habit, like massaging for a 60-second count every time you have some privacy in the bathroom. That should typically provide at least 3 rounds daily. This method can reduce the duration and extent of your scars.
This shortens the timeline. I recommend starting with all three phases and continuing it for a month. If one of the phases doesn’t seem to be working for you, stop it after a month, but continue with the other two. I’ve found that patients who use this three-pronged method tend to wind up with better scars than those who don’t.
Got a question? CALL (206) 467-1101
or use this online form